Showing posts with label Quilt Blocks. Show all posts

How to Make Multiple Half Square Triangles

How to Make Multiple Half Square Triangles


Make your quilts faster with these two easy-to-do methods for making multiple HST squares.


Make 4-in-1 HSTs

Instructions

  1.  Place squares right side facing.
  2.  Stitch 1/4 inch around the outside of the squares.
  3.  Make pencil lines dividing the squares from corner to corner.
  4.  Cut along these two lines.
  5.  Flip HST and press. Square Up if necessary.

Make 8-in-1 HSTs 

Instructions

  1.  Place squares right side facing.
  2.  Draw a line from corner to corner.
  3.  Stitch 1/4 inch away from the lines you drew.
  4.  Make pencil lines dividing the squares in four parts.
  5.  Cut along these two lines.
  6.  Cut from corner to corner being careful not to cut the stitch line.
  7.  Flip HST and press. Square Up if necessary.

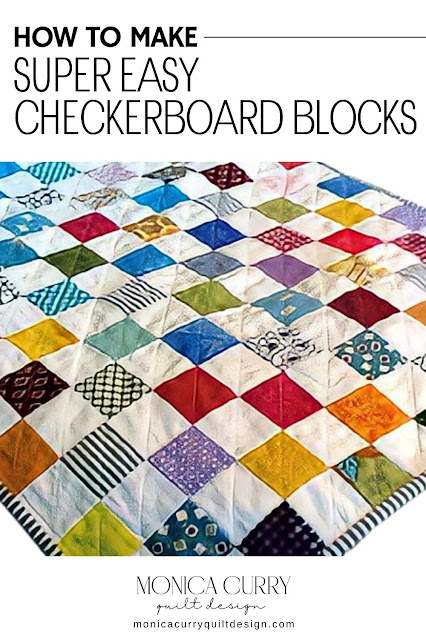
Make Super Easy Checkerboard Blocks - SCRAP BUSTER!

make super easy checkerboard blocks


INSTRUCTIONS

I discovered this technique for making scrap checkerboard blocks several years ago. I used it to make my grand-niece a doll quilt (above). With these few easy steps, the results are so worth it. When you're finished, every square will be aligned perfectly and you'll have a strong base to join the blocks so they won't stretch out of shape.

Finished Block: 12"x 12" (30 cm x 30 cm))

1.  First, you'll need a non-woven, lightweight, single-sided fusible interfacing. I purchased this very inexpensive one on Amazon.


2.  Cut [18] 2½-inch (6 cm) colour squares and [18] 2½-inch (6 cm) light colour squares.

3.  Cut [1] 13" x 13" (31 cm x 31 cm) square of interfacing.

4.  Place squares 1/2" from the edges on the adhesive side of the interfacing. Butt together the squares as shown below alternating between light and dark colours.


5.  Place a piece of cotton over the squares and press to adhere them to the fusible web.


6. Fold the first row right sides facing and sew a  "fat" 1/4" seam allowance. Repeat this until all the rows are stitched.


7.  Your first set of rows will look like this.


8.  Trim a about 1/8" off the edge of each seam row and press seam open. Be very careful to not cut the stitches!


9.  Stitch the horizontal rows and trim the seams the same as you did with the vertical rows.


10.  Press down all your seams. This is what your stitched squares will look like from behind.


11.  Press block and square up if necessary. You can see how precisely the squares are lined up.


If you need help organizing your scraps before you start, go to my scrap sorting tutorials below:

How to Square Up Hourglass & Pinwheel Blocks: No special ruler required!

This post is a supplementary tutorial for the Quick Block Calculator.

How to Square Up Hourglass & Pinwheel Blocks

When using the shortcut methods to make Hourglass and Pinwheel blocks, you often have to "square up" the block to the correct size you need. If these blocks are not squared up properly, you will end up with very wonky looking squares that will only be good for the scrap pile.

In this post, I'll show you a simple method for squaring up Hourglass, Pinwheel, and Half Square Triangle blocks that doesn't require a special ruler.

MATERIALS

INSTRUCTIONS

Hour Glass
  1. Divide the desired block size in half, e.g. 4½"÷ 2 = 2¼"
  2. Find this number on the ruler.
  3. Place a piece of tape horizontally and vertically on the ruler to mark the center of the block.
  4. Line up intersecting point of the tape with the center of the block.
  5. Line up the 45º angle with angle of the block.

6.  With a rotary cutter, cut off the exposed ends of the block.


7.  Turn the ruler and block 180º and, once again, line up the halfway point with the center of the block.


8.  With a rotary cutter, cut off the exposed ends of the block.


Pinwheel


Half Square Triangle

How to Resize Quilt Blocks and Patterns


Print Friendly and PDF

Quilt patterns can come in many sizes. But what if the size of the pattern isn't the size you want? Maybe you want a throw instead of a mini quilt or a baby quilt instead of a king-size. To resize your pattern or block, you need to know the percentage to reduce or enlarge the pattern templates. Read below to learn three easy ways to get the percentage you need to resize templates.

THREE METHODS FOR RESIZING YOUR QUILTS AND BLOCKS

1. DO THE MATH
Below is the very simple formula to get the percentage for reducing or enlarging.

ENLARGING:

Measure the shortest length of the original block size? e.g. 6 inches
What size do you want the new block to be? e.g. 8 inches
Divide the new size by the original size, e.g. 8 ÷ 6 = 1.33.
Move the decimal point two steps to the right to get your percentage = 133%.
Enter 133% into the copy machine to enlarge your 6-inch block to an 8-inch block. 

REDUCING:

Do the opposite of above.
Divide the small size (e.g. 6") by the large size (e.g. 8") to get your reduction
percentage, e.g. 6 ÷ 8 = 0.75 = 75% reduction. 

2. PROPORTIONAL SCALE
Proportional Scales may look a bit intimidating at first but they're easy to use.
You can buy a Proportional Scale for quilters HERE.


How To Use a Proportional Scale
  1. On the bottom wheel, find the original size of your block (e.g. 6"), [Fig 1].
  2. Line up this number with the new size (e.g. 8") on the top wheel, [Fig 1].
  3. In the window, you'll see the percentage of the reduction or enlargement you need to resize your block, [Fig 2]. 
Note: The math formula and proportional scale results may be off a tiny bit. This is okay.


Figure 1


Figure 2

3. PROPORTIONAL MEASUREMENT CHART
  1. Download my enlargement and reduction charts to find the percentages you need at a glance. Download PDF
  2. Find the original measurement on the left side of the chart.
  3. Go along that row until you get to the measurement you want on the top row.
  4. The number in the intersecting box is the percentage you'll need to reduce or enlarge your block


Blue Diamond Quilt Block

Who doesn't love a little bling? My cute Blue Diamond quilt block, designed in facet art style, would make a sparkling quilt.


While designing my diamond I soon realized that the facet colours had to make sense. The biggest challenge in doing faceted art is positioning the colours so that they look just right.

blue diamond mini quilt pattern detail

Below is the inspiration for my little diamond quilt. This stunning quilt titled Bling was designed, pieced, and quilted by Katherine Jones. Bling won Best in Show at the 2017 QuiltCon Quilt Show, and you can sure see why. The details in this quilt are stunning! 

bling by katherine jones
Bling by Katherine Jones

CELTIC TWIST Quilt Block | Step-by-Step Tutorial


This tutorial is for the 17" x 17" Celtic twist block shown above. It may look complicated, but it's simple to put together. There are no Y-seams and no templates to worry about. The block consists of two 6 inch units (one is a snowball block) and two different sized triangle units; that's it! You can make one block or add more units to make a quilt or table runner. I love this block for showcasing big prints.

These are the four units to make the block.

MATERIALS NEEDED FOR ONE BLOCK
(All measurements include a 1/4 inch seam allowance)

Unit 1 - Makes 4
[8] 5" x 2" dark print
[8] 5" x 2" light print
[4] 3½" x 3½" medium print

Unit 2 - Makes 4
[1] 7¼" solid

Unit 3 - Makes 4
[2] 7" solid
[4] 2" x 2" dark print

Unit 4 - Makes 1
[1] 6½" x 6½" large print
[4] 2" x 2" light print

UNIT 1 - Make 4

1. Arrange your fabric pieces to ensure you have the correct colour placement. You'll need [2] 5" x 2" dark print; [2] 5" x 2" light print; and [1] 3½" square medium print to make one 6" block.


2. Place the square and first piece right sides facing and start stitching 1 inch from the top of the square.


3. Flip and press the first piece. Place the next piece right sides facing and stitch to end.


4. Flip and press the last piece you stitched. Place the next piece right sides facing and stitch to end.


5. Flip and press the last stitch pieced. Pull back and pine the first piece sewn on and pin back. Place the last piece right sides facing and stitch to end. Flip back and press.


6. Fold back the first piece as shown and stitch to just past the starting point of your first stitches.


7. Press completed block.


UNIT 2 (One square makes four triangles)

1. Cut [1] 7¼ solid colour square.
2. Cut the square diagonally to each corner to make four triangles.


UNIT 3 - Make 4

1. Pin one [1] 2" dark print square with right sides facing on opposite corners of the 7" solid colour square and stitch as shown. Cut a 1/4 inch seam allowance from each corner square, flip and press back.

2. Cut from corner to corner parallel to stitched corners to make two triangles.


UNIT 4 - Make 1

1. Cut [1] 6½ inch large print square and [4] 2" light print squares. Pin one 2" square with right sides facing on each corner of the larger square as shown.


2. Cut a corner inch seam allowance from each corner square, flip back, and press.


BLOCK ASSEMBLY DIAGRAM